
Develop SharpMUSH
This guide is for changing SharpMUSH itself: the server’s C# code, the web portal, or the tests. If you only want to run a game, Run with Docker is quicker and needs no toolchain. Softcode, packages and plugins don’t need a source build either; see Softcode Packages and Writing Plugins.
What runs
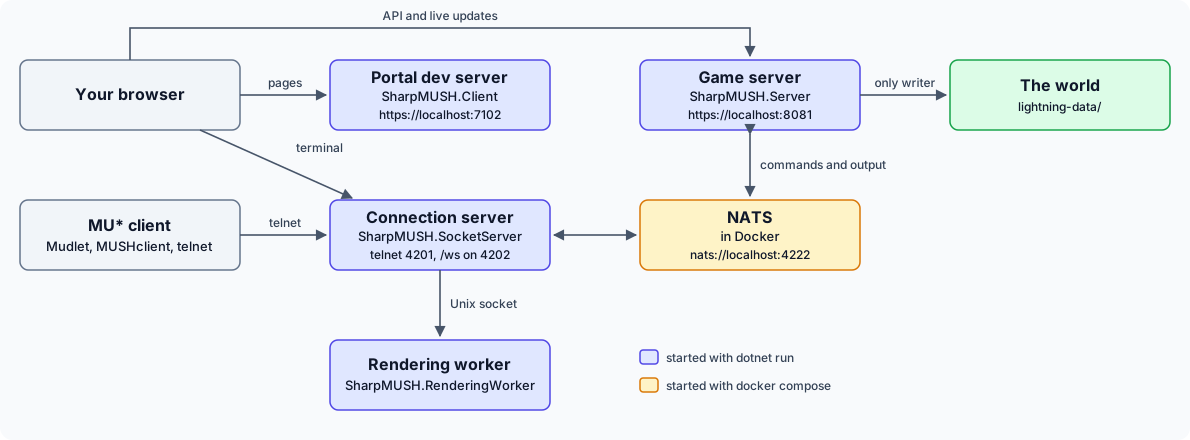
Section titled “What runs”SharpMUSH is not one program. A working game on your machine is four .NET processes plus NATS, the message bus the engine and the connection server talk through:
| Process | What it does | Address |
|---|---|---|
Game server, SharpMUSH.Server | The engine, the world, the API | https://localhost:8081 |
Connection server, SharpMUSH.SocketServer | Holds telnet and browser-terminal connections | telnet 4201, /ws on 4202 |
Rendering worker, SharpMUSH.RenderingWorker | Formats output for each kind of client | a socket file, no port |
Portal dev server, SharpMUSH.Client | Serves the web portal | https://localhost:7102 |
| NATS, in Docker | Carries commands and output between the game and connection servers | nats://localhost:4222 |
In a published image the game server serves the portal itself. A source build doesn’t bundle it, so
during development the portal comes from its own dev server and calls the game server’s API at
https://localhost:8081.
The Architecture page explains why the parts are split this way.
What you need
Section titled “What you need”-
The .NET SDK the repository pins, currently 11.0.100-rc.2. The
global.jsonfile at the root of the repository names the version; an older SDK stops with “A compatible .NET SDK was not found” before it builds anything. Microsoft’s install script fetches that exact version:Terminal window curl -sSL https://dot.net/v1/dotnet-install.sh | bash -s -- --version 11.0.100-rc.2.26504.105Terminal window Invoke-WebRequest https://dot.net/v1/dotnet-install.ps1 -OutFile dotnet-install.ps1./dotnet-install.ps1 -Version 11.0.100-rc.2.26504.105The script doesn’t change your
PATH. Add the folder it reports (~/.dotneton Linux and macOS,%LOCALAPPDATA%\Microsoft\dotneton Windows) to yourPATHbefore runningdotnet. -
Docker, running. NATS runs in a container, and the test suite starts its own containers.
-
Git, to clone the repository.
-
A trusted HTTPS development certificate, so your browser accepts
https://localhost. Run this once:Terminal window dotnet dev-certs https --trust -
An editor. Visual Studio, JetBrains Rider and VS Code with the C# Dev Kit all work, as long as they use the SDK above. None is required: everything below works from a terminal.
Run it from source
Section titled “Run it from source”This is the setup for day-to-day work: each process runs from your checkout, so you can stop one, change it, and start it again while the others keep running.
-
Clone the repository and build it.
Terminal window git clone https://github.com/SharpMUSH/SharpMUSH.gitcd SharpMUSHdotnet buildThe first build restores packages and takes a few minutes.
-
Start NATS.
Terminal window docker compose up -d natsThis starts only the
natsservice from the repository’s Compose file, on port 4222, and leaves it running in the background. -
Point the game server and the connection server at it.
Every terminal that starts one of them needs
NATS_URL:Terminal window export NATS_URL=nats://localhost:4222Terminal window $env:NATS_URL = "nats://localhost:4222" -
Start the processes, each in its own terminal, from the repository root.
Terminal window dotnet run --project SharpMUSH.RenderingWorkerdotnet run --project SharpMUSH.SocketServerdotnet run --project SharpMUSH.Serverdotnet run --project SharpMUSH.ClientStart the rendering worker first, because the connection server sends all output through it. The game server is ready when
https://localhost:8081/api/healthanswers{"status":"ready"}.You don’t need to set anything else. Each project’s launch settings already choose its ports, the
Developmentenvironment, and the same rendering socket path (/tmp/sharpmush-render.sock) for the connection server and the rendering worker. -
Claim the game.
Open
https://localhost:7102. A new world opens on the setup wizard: choose a username and password for the administrator account, which is linked to God (#1). The wizard then offers to import a PennMUSH, RhostMUSH or TinyMUX database, asks which objects handle HTTP requests and events, and which bundled packages to install. -
Connect a MU* client.
Point it at
localhost, port4201, or use the terminal in the portal.
To stop, press Ctrl+C in each terminal, then docker compose stop nats.
Where your world is kept
Section titled “Where your world is kept”The game server keeps the world in a folder named lightning-data, in the folder you started it
from: the repository root, if you followed the steps above. The keys that protect sign-in cookies go
beside it, in lightning-data.dataprotection-keys.
To start again from an empty world, stop the game server and delete both folders. The next start creates a fresh world and the setup wizard appears again.
To keep the world somewhere else, set SHARPMUSH_LIGHTNING_PATH before starting the game server.
In an IDE
Section titled “In an IDE”Debug whichever process holds the code you’re changing. Commands, functions and everything else the
game does run in SharpMUSH.Server; telnet and the browser terminal are SharpMUSH.SocketServer;
how output looks in each client is SharpMUSH.RenderingWorker; pages are SharpMUSH.Client.
- Rider: the repository ships a run configuration named Servers and Client that starts all four.
- Visual Studio: right-click the solution, choose Configure Startup Projects, pick Multiple startup projects, and set the four projects to Start.
- VS Code: use the terminal commands above.
Start NATS yourself first, as in step 2. An IDE doesn’t read NATS_URL from your shell, so set it as
a user environment variable (or in each project’s run settings) and restart the IDE.
Run the whole stack in Docker
Section titled “Run the whole stack in Docker”To see your change the way it ships, build images from your checkout and run them together:
docker compose up --buildThis builds three images (the game server with the portal inside it, the connection server, and the
rendering worker) and starts them with NATS. The portal is at http://localhost:8080 and telnet on
port 4201. The world is in the app-data Docker volume, so it survives a rebuild. Run the same
command again after a change.
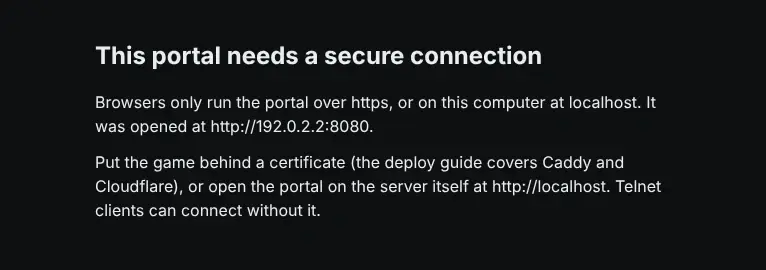
Open the portal on the same computer, at localhost. Browsers run it only over https or at
localhost, so from another computer on your network, over plain http, it shows this page instead of
the portal. Telnet works from anywhere.
To try the latest build of main without building anything, use the published images instead:
docker compose -f docker-compose-hub.yml upNeither file is meant for hosting a game. For that, use the deploy/ folder described in
Run with Docker.
Settings you might change
Section titled “Settings you might change”Each process reads environment variables, or the same settings from its appsettings.json (a double
underscore in a variable name stands for a nested setting, so ConnectionServer__TelnetPort is
ConnectionServer:TelnetPort).
| Variable | What it does | Default with dotnet run |
|---|---|---|
NATS_URL | Where the game server and connection server find NATS | each starts a NATS container |
SHARPMUSH_LIGHTNING_PATH | The game server’s world folder | lightning-data |
PENNMUSH_DATABASE_PATH | A PennMUSH flatfile the game server imports when it starts | none |
ASPNETCORE_URLS | The game server’s addresses | https://localhost:8081, http://localhost:8080 |
ConnectionServer__TelnetPort | The connection server’s telnet port | 4201 |
ConnectionServer__HttpPort | The connection server’s port for /ws | 4202 |
Rendering__SocketPath | The socket file the connection server and rendering worker share; set both to the same file | /tmp/sharpmush-render.sock |
ASPNETCORE_ENVIRONMENT | Development turns on detailed errors and development-only endpoints | Development |
Everything about running a real game (backups, durability, storage limits, history retention) is in the Deployment Reference.
Run the tests
Section titled “Run the tests”The test framework is TUnit. Keep Docker running: the main suite starts its own
NATS container, separate from the one you started above, and a MySQL container that the sql() and
@sql tests query as an external database.
# The main suite: engine, commands, functions, serverdotnet run --project SharpMUSH.Tests
# One test class, or one testdotnet run --project SharpMUSH.Tests -- --treenode-filter "/*/*/BuildingCommandTests/*"dotnet run --project SharpMUSH.Tests -- --treenode-filter "/*/*/BuildingCommandTests/CreateObject"
# Portal components (no Docker needed)dotnet run --project SharpMUSH.Tests.BUnit
# HTTP, sign-in, packages and other end-to-end checksdotnet run --project SharpMUSH.Tests.Integration
# The Scene plugindotnet run --project SharpMUSH.Tests.ScenePlugin
# The portal's startup scriptsnode --test tools/client-tests/*.test.mjs
The filter is /<assembly>/<namespace>/<class>/<test>, with * matching anything. Add
--output detailed to see each test as it runs, and set SHARPMUSH_ENABLE_TEST_CONSOLE_LOGGING=true
to see the server’s log while investigating a failure. The full main suite takes several minutes;
while working, run the classes you touched.
dotnet test also runs the tests, with less readable output.
Comparing with PennMUSH
Section titled “Comparing with PennMUSH”The repository includes a harness, tools/parity/run.sh, that runs the same scripted telnet sessions
against a reference PennMUSH and against SharpMUSH and reports every difference in output. It needs a
built PennMUSH checkout and Python 3.10 or later, and starts its own NATS without Docker. Each fix for
a PennMUSH difference adds a scenario under tools/parity/scenarios/.
Before you open a pull request
Section titled “Before you open a pull request”-
Formatting is checked on every build. C# files use tabs. If a build stops with
FORMAT001, run the command in the message, which looks like this, until it reports no changes (it can take two passes):Terminal window dotnet format whitespace --folder SharpMUSH.Server --exclude "**/bin/**" --exclude "**/obj/**" -
Warnings are errors in most projects, so a build with a new warning fails.
-
Some files are generated. The softcode parser’s grammar comes from
SharpMUSH.Parser.Generated/generate-parser.py; change that script and run it rather than editingSharpMUSHParser.g4. -
Run the tests for what you changed, and add one that fails without your change.